ClickFunnels Demo: A Step-by-Step Walkthrough of the Platform
Our Verdict
Conclusion
What we like
- ✓Drag-and-drop editor requires zero coding knowledge
- ✓Pre-built funnel templates for every use case
- ✓Built-in email automation, A/B testing, and analytics
- ✓14-day free trial gives full access to all features
- ✓Integrates with Stripe, PayPal, and major email platforms
What could be better
- ✗Starts at $97/month after the trial ends
Includes 14-day free trial · No commitment required
Start Your Free TrialClickFunnels does not offer a traditional software demo where a sales rep walks you through the platform on a call. Instead, the best way to demo ClickFunnels is to sign up for the 14-day free trial and build a funnel yourself - with full access to every feature.
This guide walks you through exactly what you will see when you log in, how to create your first funnel, and how to use the key features so you can evaluate whether ClickFunnels is the right tool for your business.
Step 1: Create Your Free Account
To start your ClickFunnels demo, sign up for a free trial. The process takes under two minutes:
- Visit the ClickFunnels website and click "Start Free Trial"
- Enter your name, email address, and create a password
- Enter your credit card details (you will not be charged during the 14-day trial)
- Choose your plan - Basic ($97/month) or Pro ($297/month)
Once your account is created, you land on the ClickFunnels dashboard. This is your central hub for building funnels, managing contacts, viewing analytics, and accessing training.
Step 2: Choose a Funnel Template
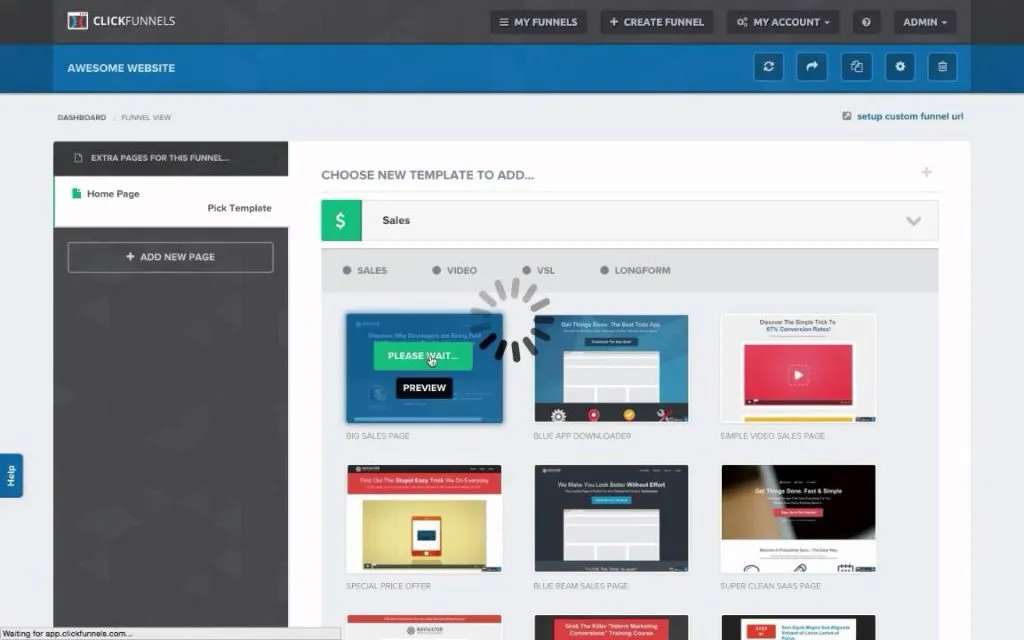
ClickFunnels organises its templates by goal. When you click "Create New Funnel," you are asked what you want to accomplish:
- Collect leads - opt-in funnels for building your email list
- Sell a product - sales funnels with order forms, upsells, and downsells
- Host a webinar - registration and replay funnels for live or automated webinars
- Launch a product - launch sequences with countdown timers and early access pages
- Build a membership - gated content areas with login and drip access
Each goal has multiple pre-built templates designed by the ClickFunnels team and community. Templates include all the pages you need - landing page, sales page, order form, upsell page, and thank-you page - connected in the correct sequence.
Select a template, preview it, and click "Use This Funnel" to add it to your account.
Step 3: Customise Your Pages
The ClickFunnels page editor is a drag-and-drop builder. You click on any element - headline, image, button, video, form - and edit it directly on the page. No coding required.
Key elements you can add to any page:
- Headlines and text blocks - edit copy inline with formatting options
- Images and video - upload images or embed YouTube and Vimeo videos
- Buttons - customise text, colour, size, and link destination
- Order forms - connect to Stripe or PayPal for payment processing
- Countdown timers - create urgency with deadline timers
- Opt-in forms - capture name, email, phone, and custom fields
- Testimonials - add social proof sections with photos and quotes
- FAQ accordions - address objections directly on the sales page
The editor also supports mobile-responsive editing - you can switch to mobile view and adjust the layout specifically for phone screens.
Step 4: Connect Your Integrations
ClickFunnels integrates with the tools you already use. From the account settings, you can connect:
Payment processors:
- Stripe (credit/debit cards)
- PayPal
- Authorize.net
- NMI
Email marketing platforms:
- Mailchimp
- ActiveCampaign
- ConvertKit
- AWeber
- GetResponse
- Drip
Other integrations:
- Zapier (connects to thousands of apps)
- Twilio (SMS notifications)
- Shopify (e-commerce sync)
- WordPress (embed funnels on your site)
You can also use ClickFunnels' built-in email tool, Follow-Up Funnels, which eliminates the need for a separate email platform.
Step 5: Set Up Email Automation
ClickFunnels includes Follow-Up Funnels (formerly Actionetics) for email and SMS automation. You can create automated sequences that trigger based on user actions:
- Welcome sequence - send a series of emails after someone opts in
- Abandoned cart recovery - follow up with visitors who started but did not complete a purchase
- Post-purchase sequence - deliver digital products, upsell related offers, or request reviews
- Broadcast emails - send one-time emails to your entire list or a segment
Each email is built with a visual editor. You can personalise with merge tags (first name, purchase history), add countdown timers, and track opens and clicks.
Step 6: Run A/B Split Tests
Split testing is built into every ClickFunnels page. To create a test:
- Open the funnel and click the page you want to test
- Click "Create Variation" to duplicate the page
- Edit the variation - change the headline, button colour, image, or layout
- Set the traffic split (e.g., 50/50)
- Click "Start Split Test"
ClickFunnels tracks visitors, conversions, and revenue for each variation. After collecting enough data, you can declare a winner and direct all traffic to the best-performing version.
For more on what to test, check out our review of 108 Proven Split Test Winners - a free book by Russell Brunson with 108 data-backed test results.
Step 7: Monitor Your Analytics
The ClickFunnels Stats tab shows real-time performance data for each funnel:
- Page views - how many visitors each page receives
- Opt-in rate - percentage of visitors who submit their information
- Sales conversion rate - percentage of visitors who complete a purchase
- Average cart value - average revenue per transaction
- Revenue - total earnings per funnel
This data helps you identify which pages are performing well and which need improvement. Combined with split testing, you can systematically increase your conversion rates over time.
What Can You Build During the Demo?
During the 14-day free trial, you can build and launch real funnels. Here are common use cases:
| Use Case | Funnel Type | Example |
|---|---|---|
| Lead generation | Opt-in funnel | Free ebook download in exchange for email |
| Product sales | Sales funnel | Product page → order form → upsell → thank you |
| Online course | Membership funnel | Sales page → checkout → member area with lessons |
| Webinar | Webinar funnel | Registration → confirmation → live room → replay |
| Consulting | Application funnel | Landing page → application form → booking calendar |
Everything you build during the trial is fully functional - you can drive real traffic and make real sales. If you decide to continue, your funnels remain as they are. If you cancel, nothing is charged.
Tips for Getting the Most From Your Demo
- Start with one funnel - do not try to build everything at once. Pick your most important offer and build a single funnel for it
- Use a template - editing a proven template is faster and more effective than starting from scratch
- Watch the training - FunnelFlix includes free courses on funnel strategy, copywriting, and traffic generation
- Take the One Funnel Away Challenge - this 30-day training programme walks you through building and launching your first funnel with daily coaching from Russell Brunson
- Connect a payment processor early - set up Stripe or PayPal on day one so you can test the full purchase flow
Final Verdict
The best ClickFunnels demo is the free trial itself. You get 14 days of unrestricted access to build, test, and launch real funnels. No feature limitations, no watermarks, no restrictions.
If you can commit a few hours to going through the template library, customising a funnel, and connecting your integrations, you will have a clear picture of whether ClickFunnels fits your business - and you might even make your first sale before the trial ends.
For a full breakdown of what the platform offers, read our ClickFunnels review. For pricing details, see our ClickFunnels pricing guide.